Hershey Hugs Bees

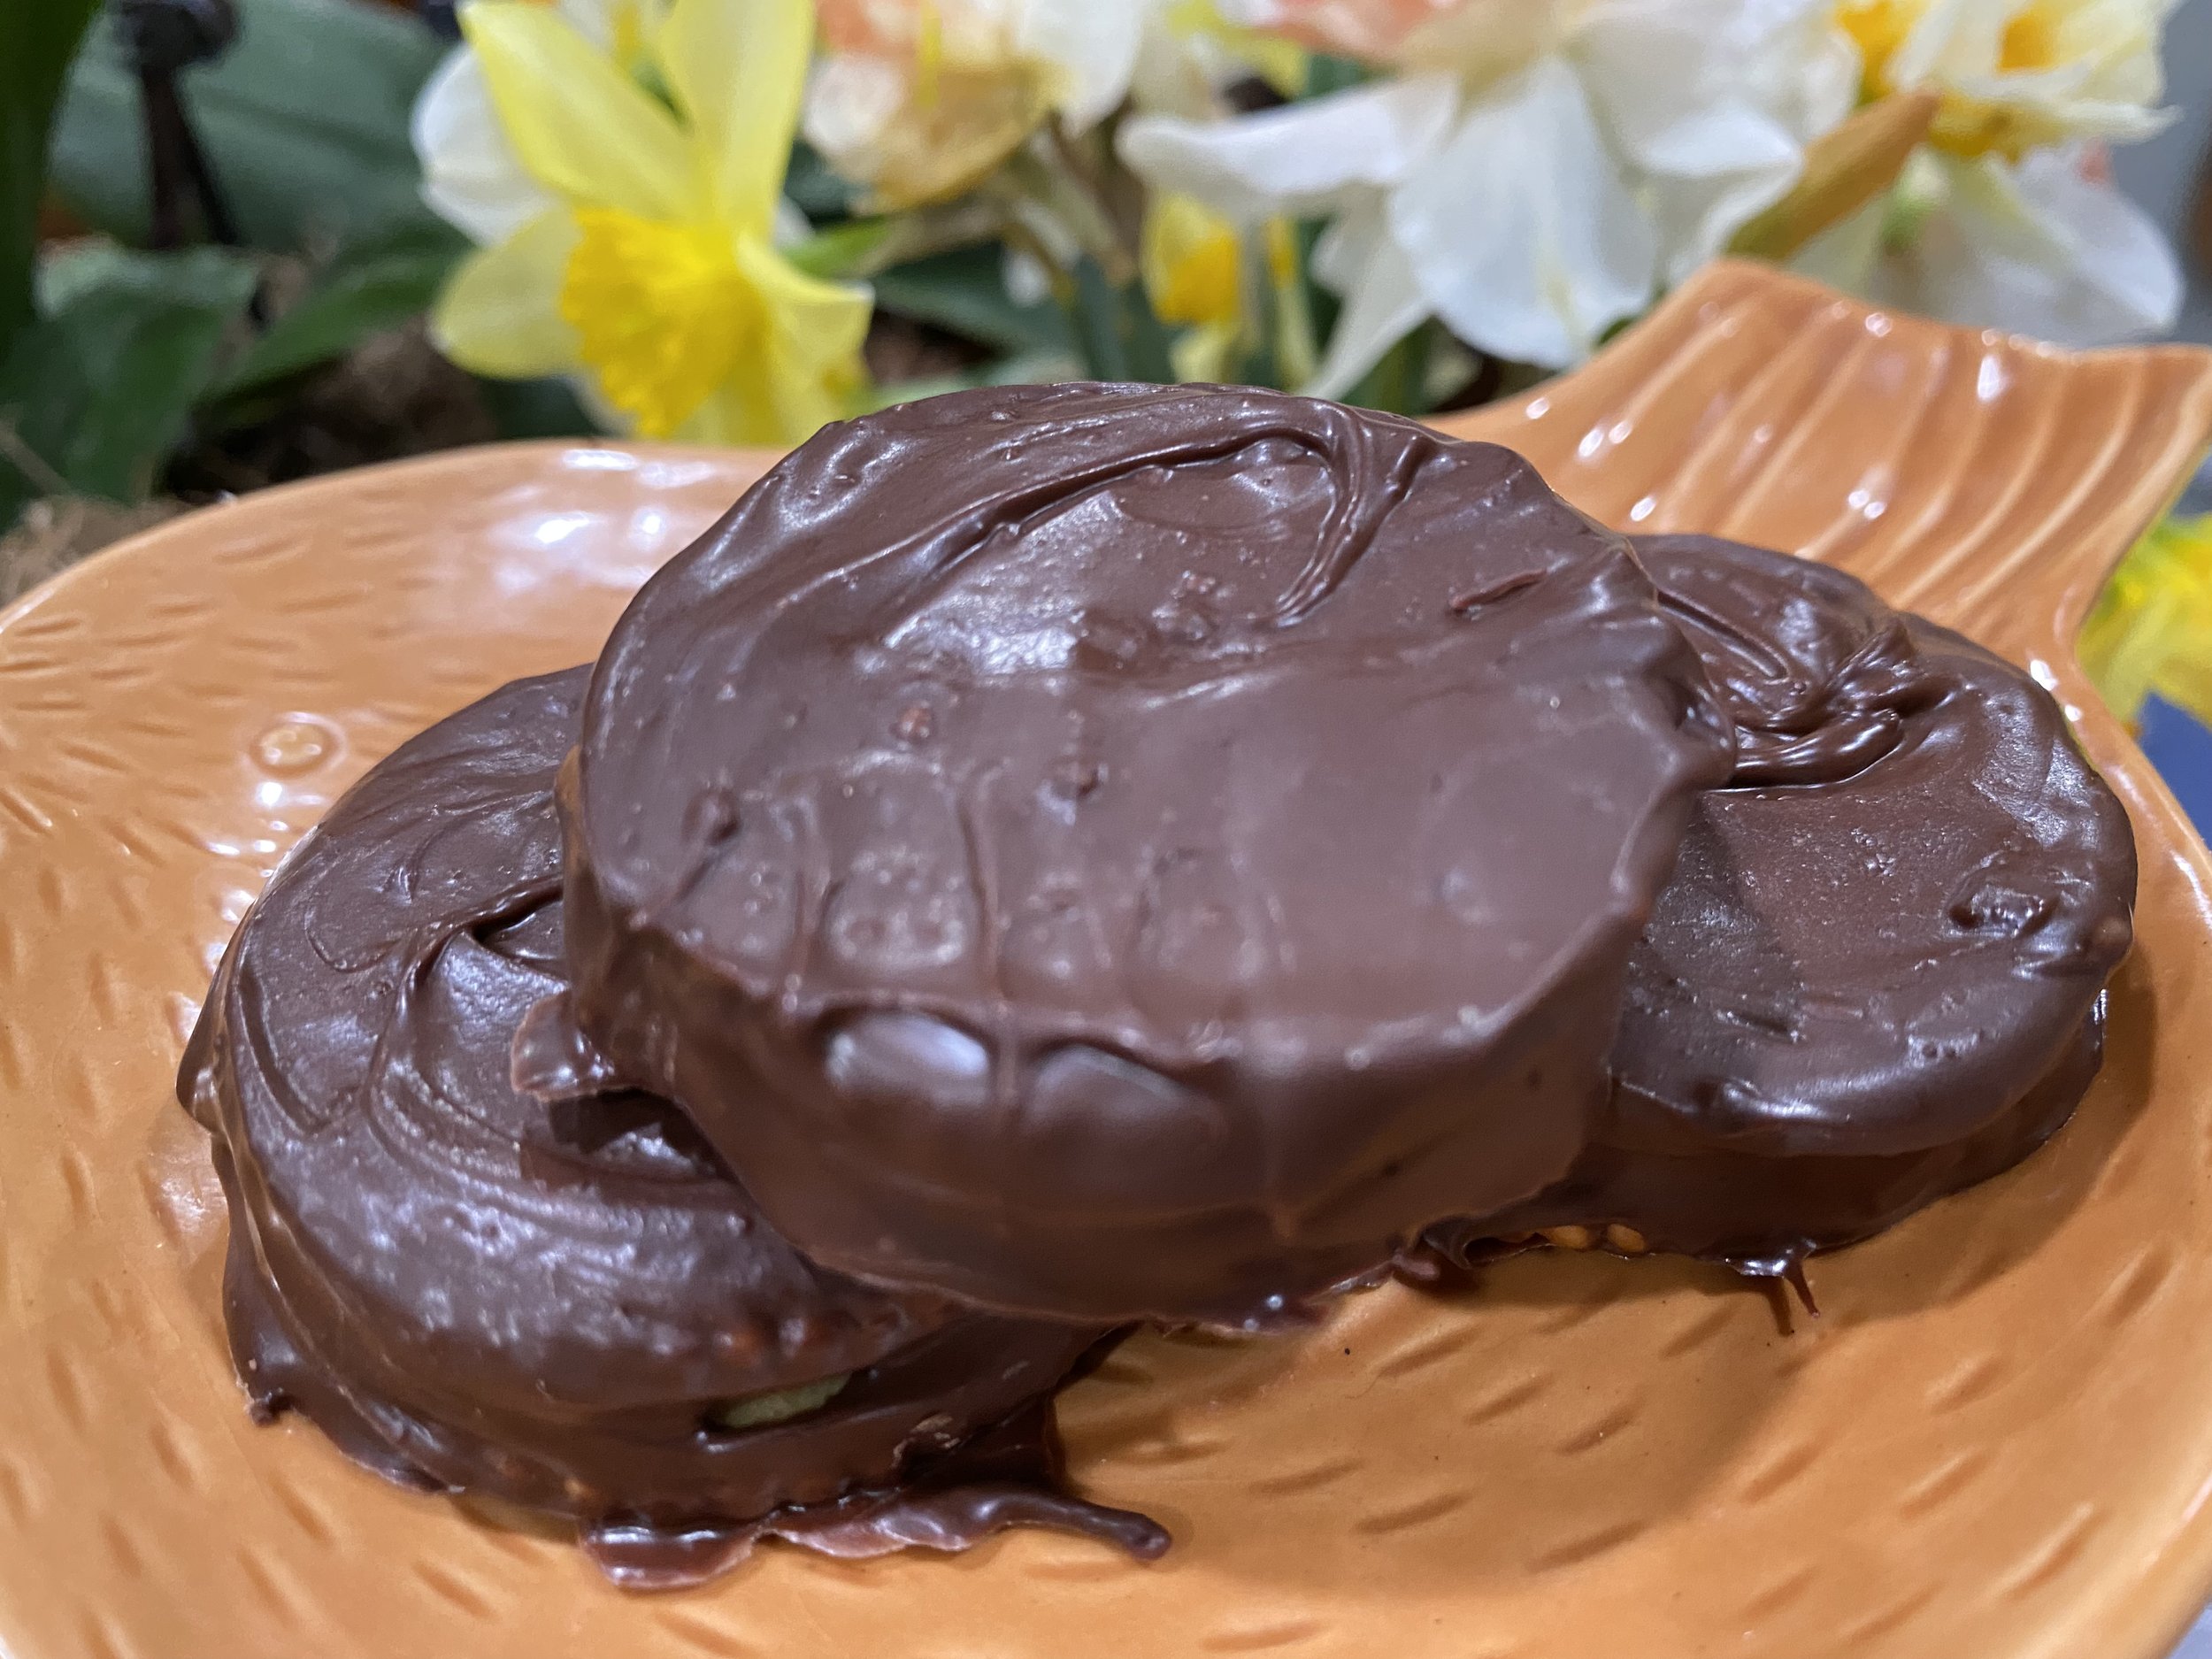
Hershey Hugs Bees Front (left) and back (right). (charlotte ekker wiggins photo)

Hershey Hugs Bees

Fun and easy to make, I developed these Hershey Hugs bees as a special treat for beekeeping friends.

If you have made Hershey Kisses Mice, these are very similar and include the same ingredients except you use Hershey Hugs instead of Hershey Kisses.

You will need:

Hershey Hugs with wrappers removed

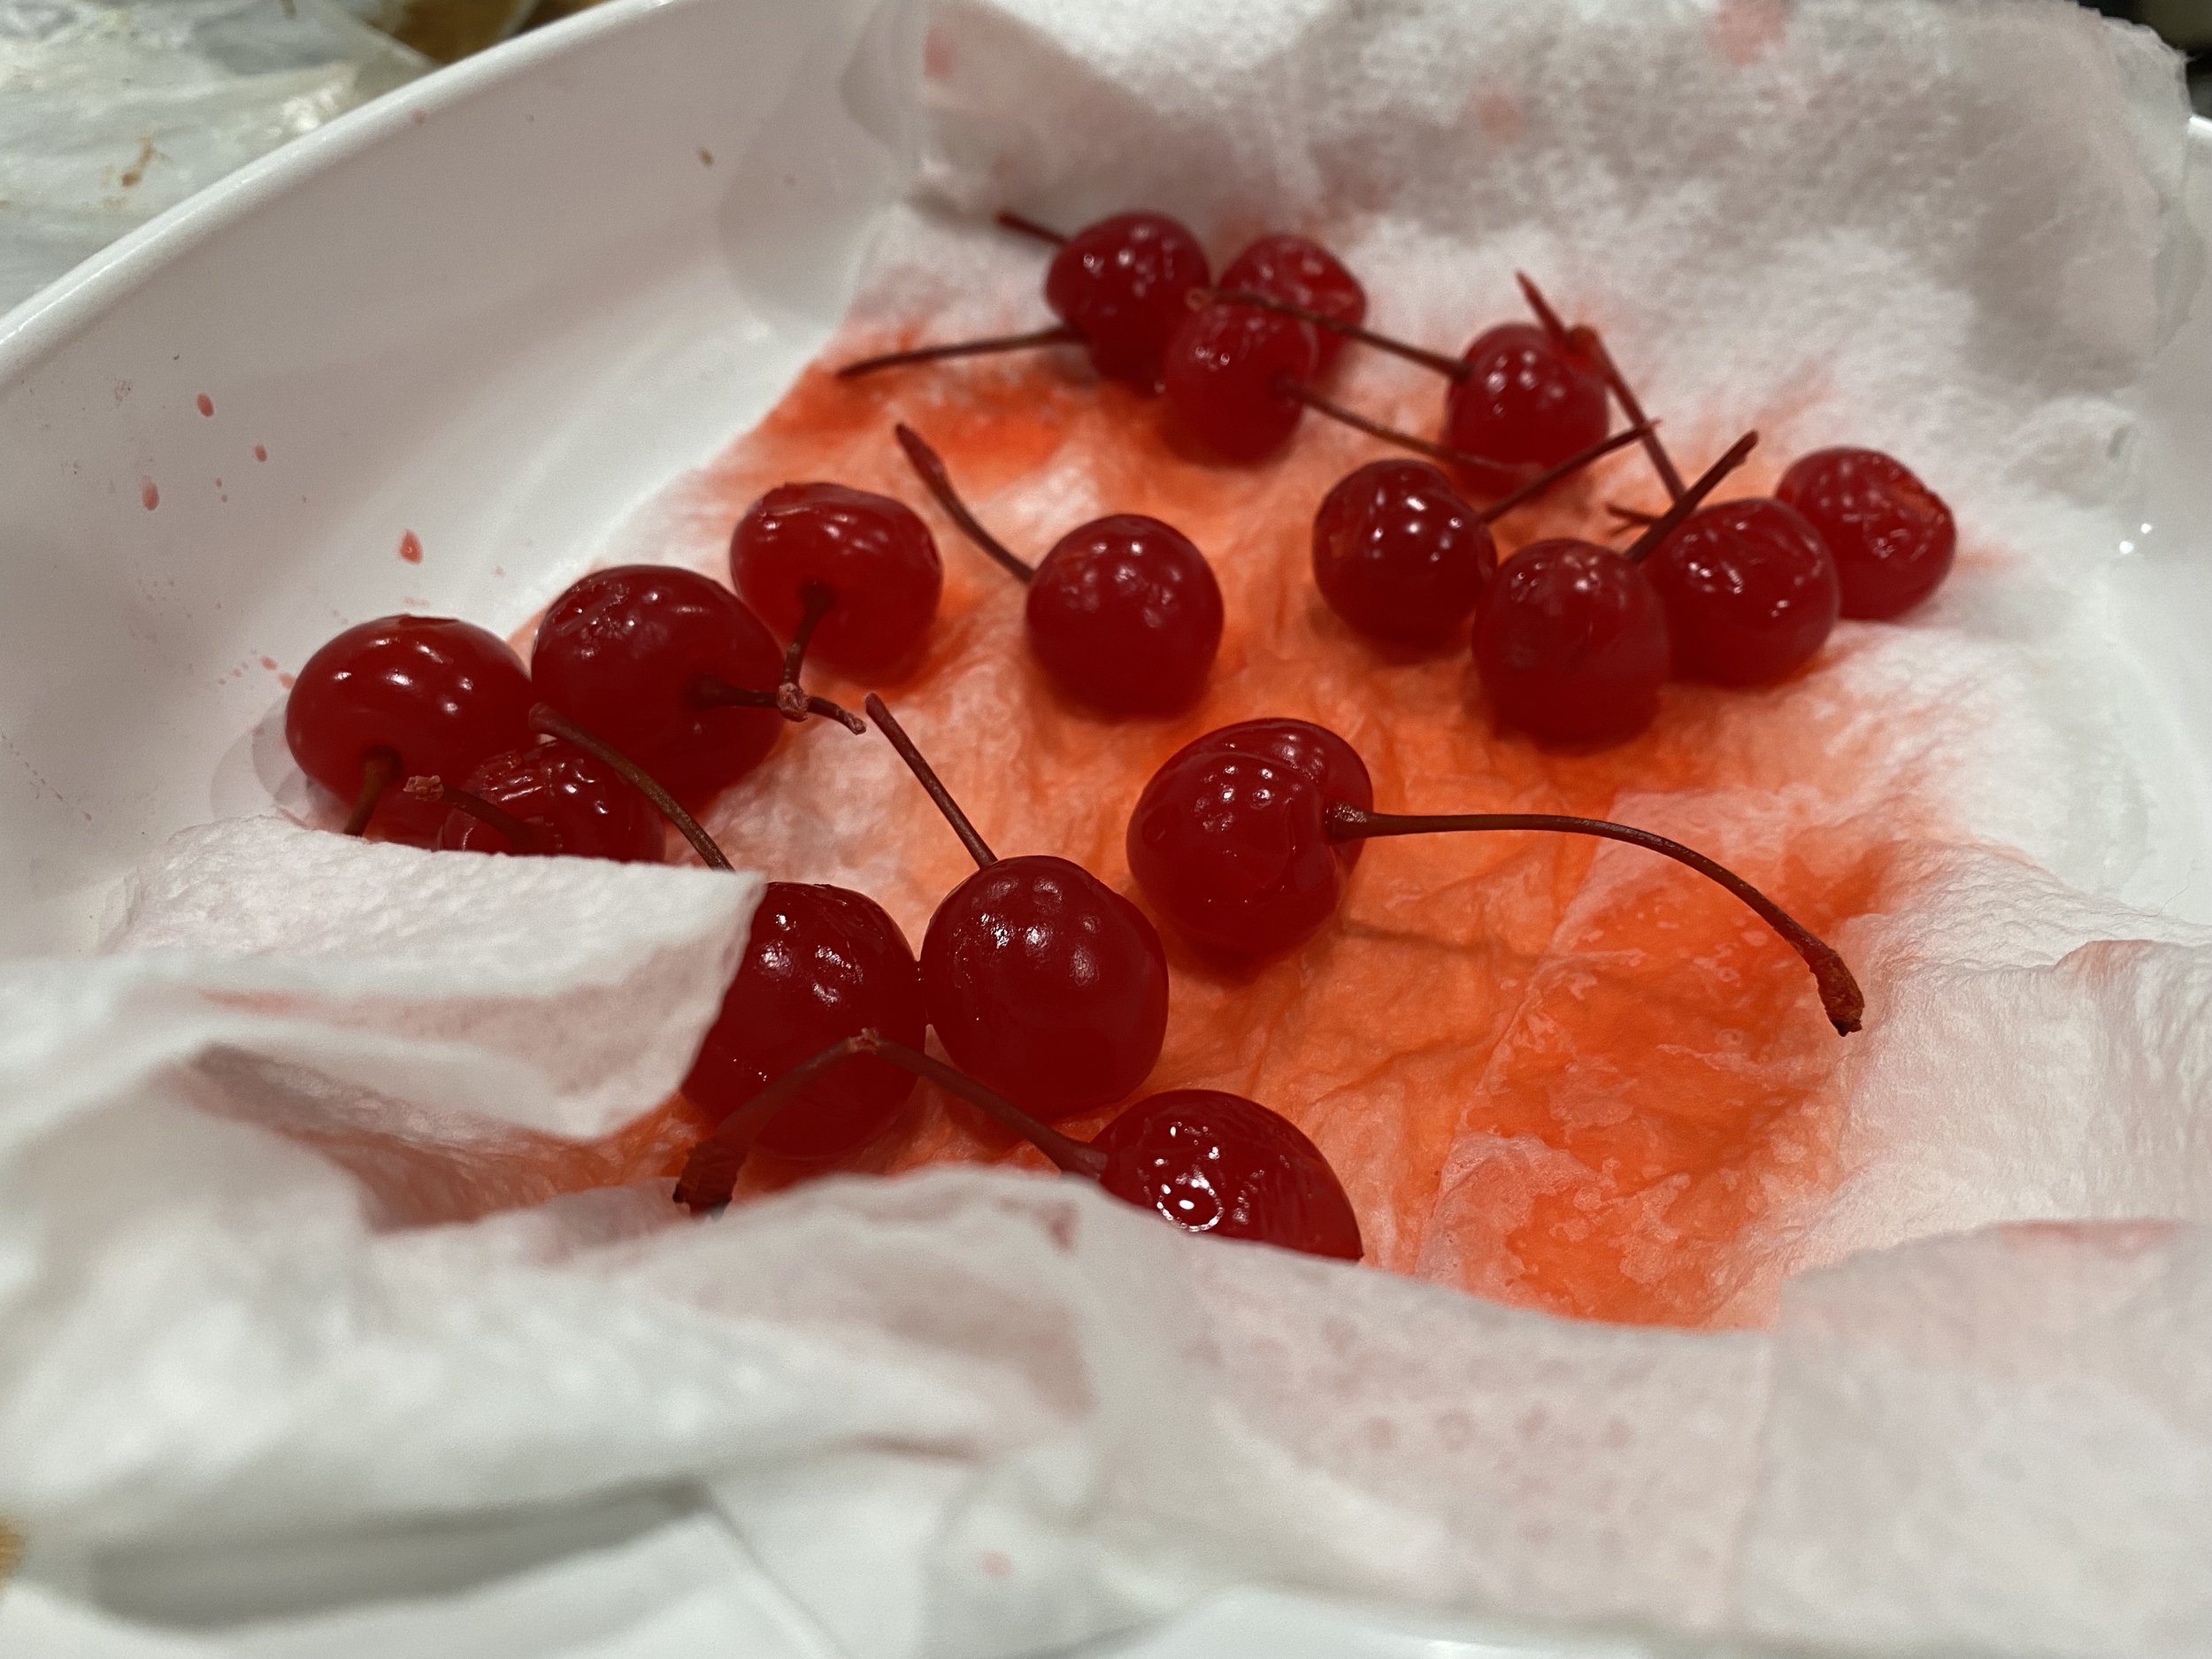
Maraschino cherries (without stems)

Almost slivers

White almond bark

Toothpicks

Black icing

Wax paper

Cookie sheet

These are fun to make as a group. Helps to have extra hands to make sure the Hershey Hug sticks to the maraschino cherry.

To make:

Drain (or save for later use) Maraschino cherry juice. Allow cherries to drain on paper towel.

Remove wrapping from Hershey Hugs. Sampling is allowed but not too much or you won’t have many left for bees!

Spread wax paper on cookie sheet.

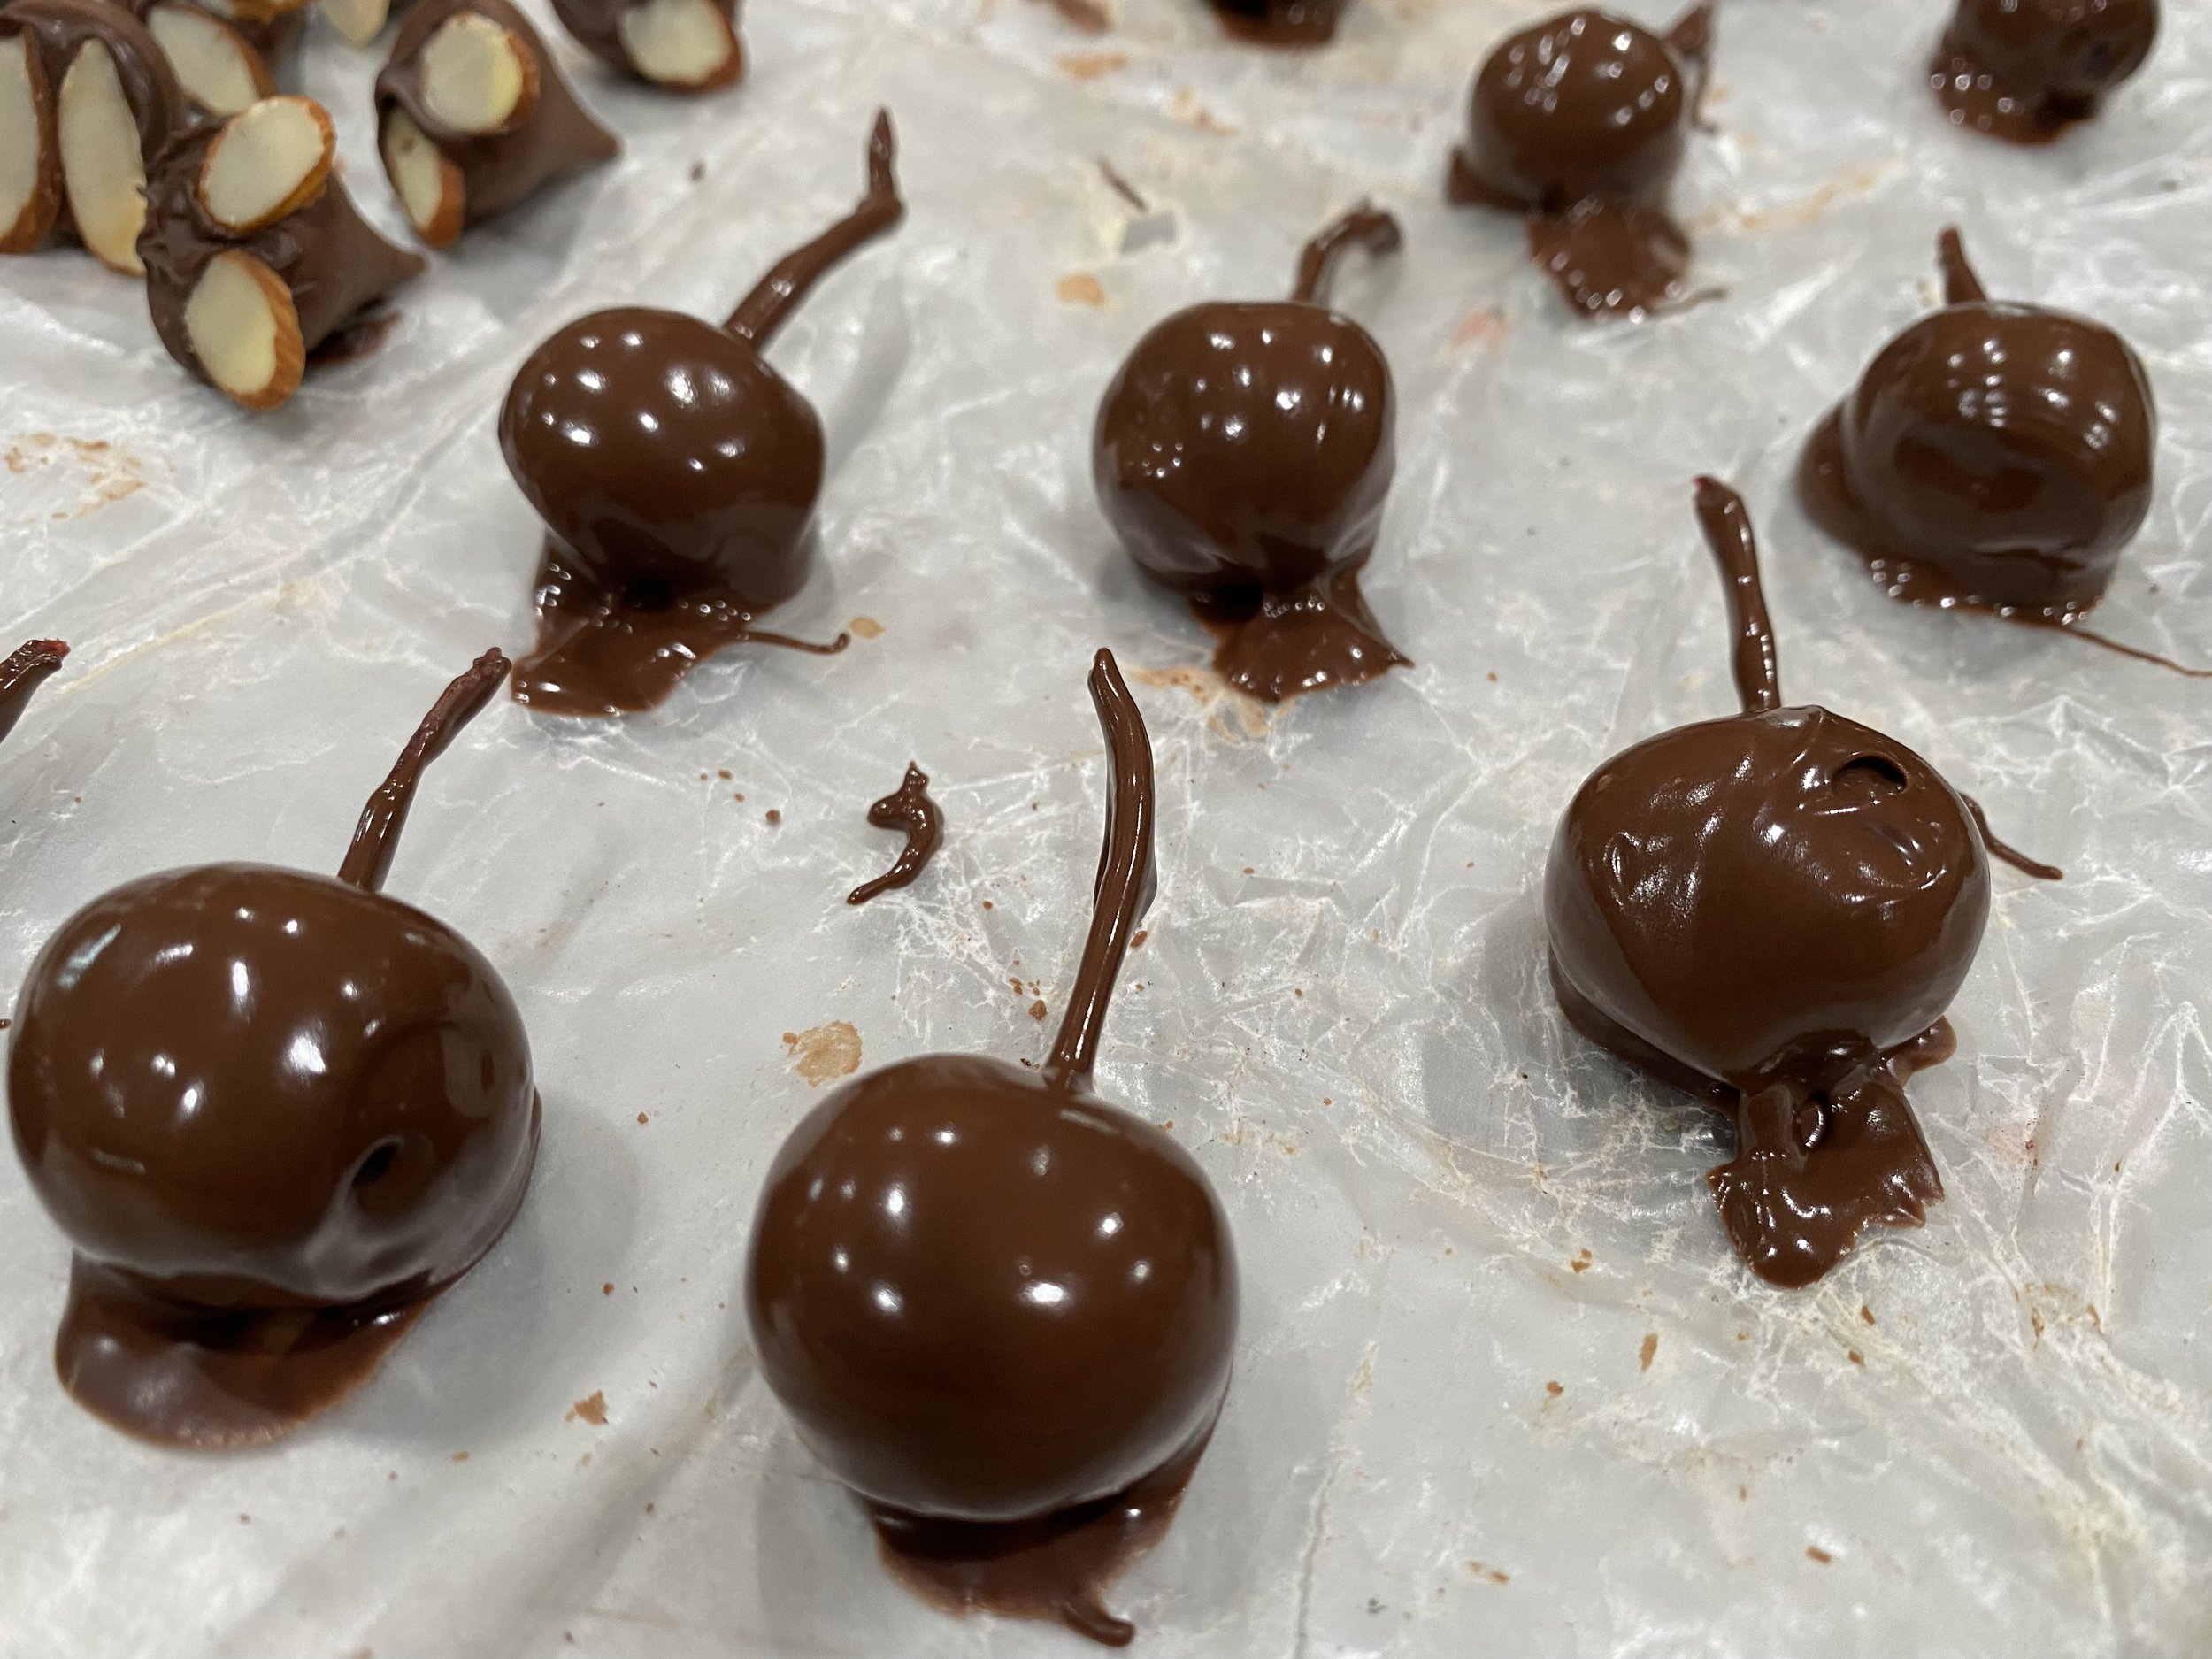
Microwave 3 white almond bark chocolate pieces in a narrow container for 1.5 minutes until melted. Time may vary depending on your microwave. You want the almond bark melted for easy dipping.

Dip a maraschino cherry in the almond bark until fully coated. Place on wax paper to dry.

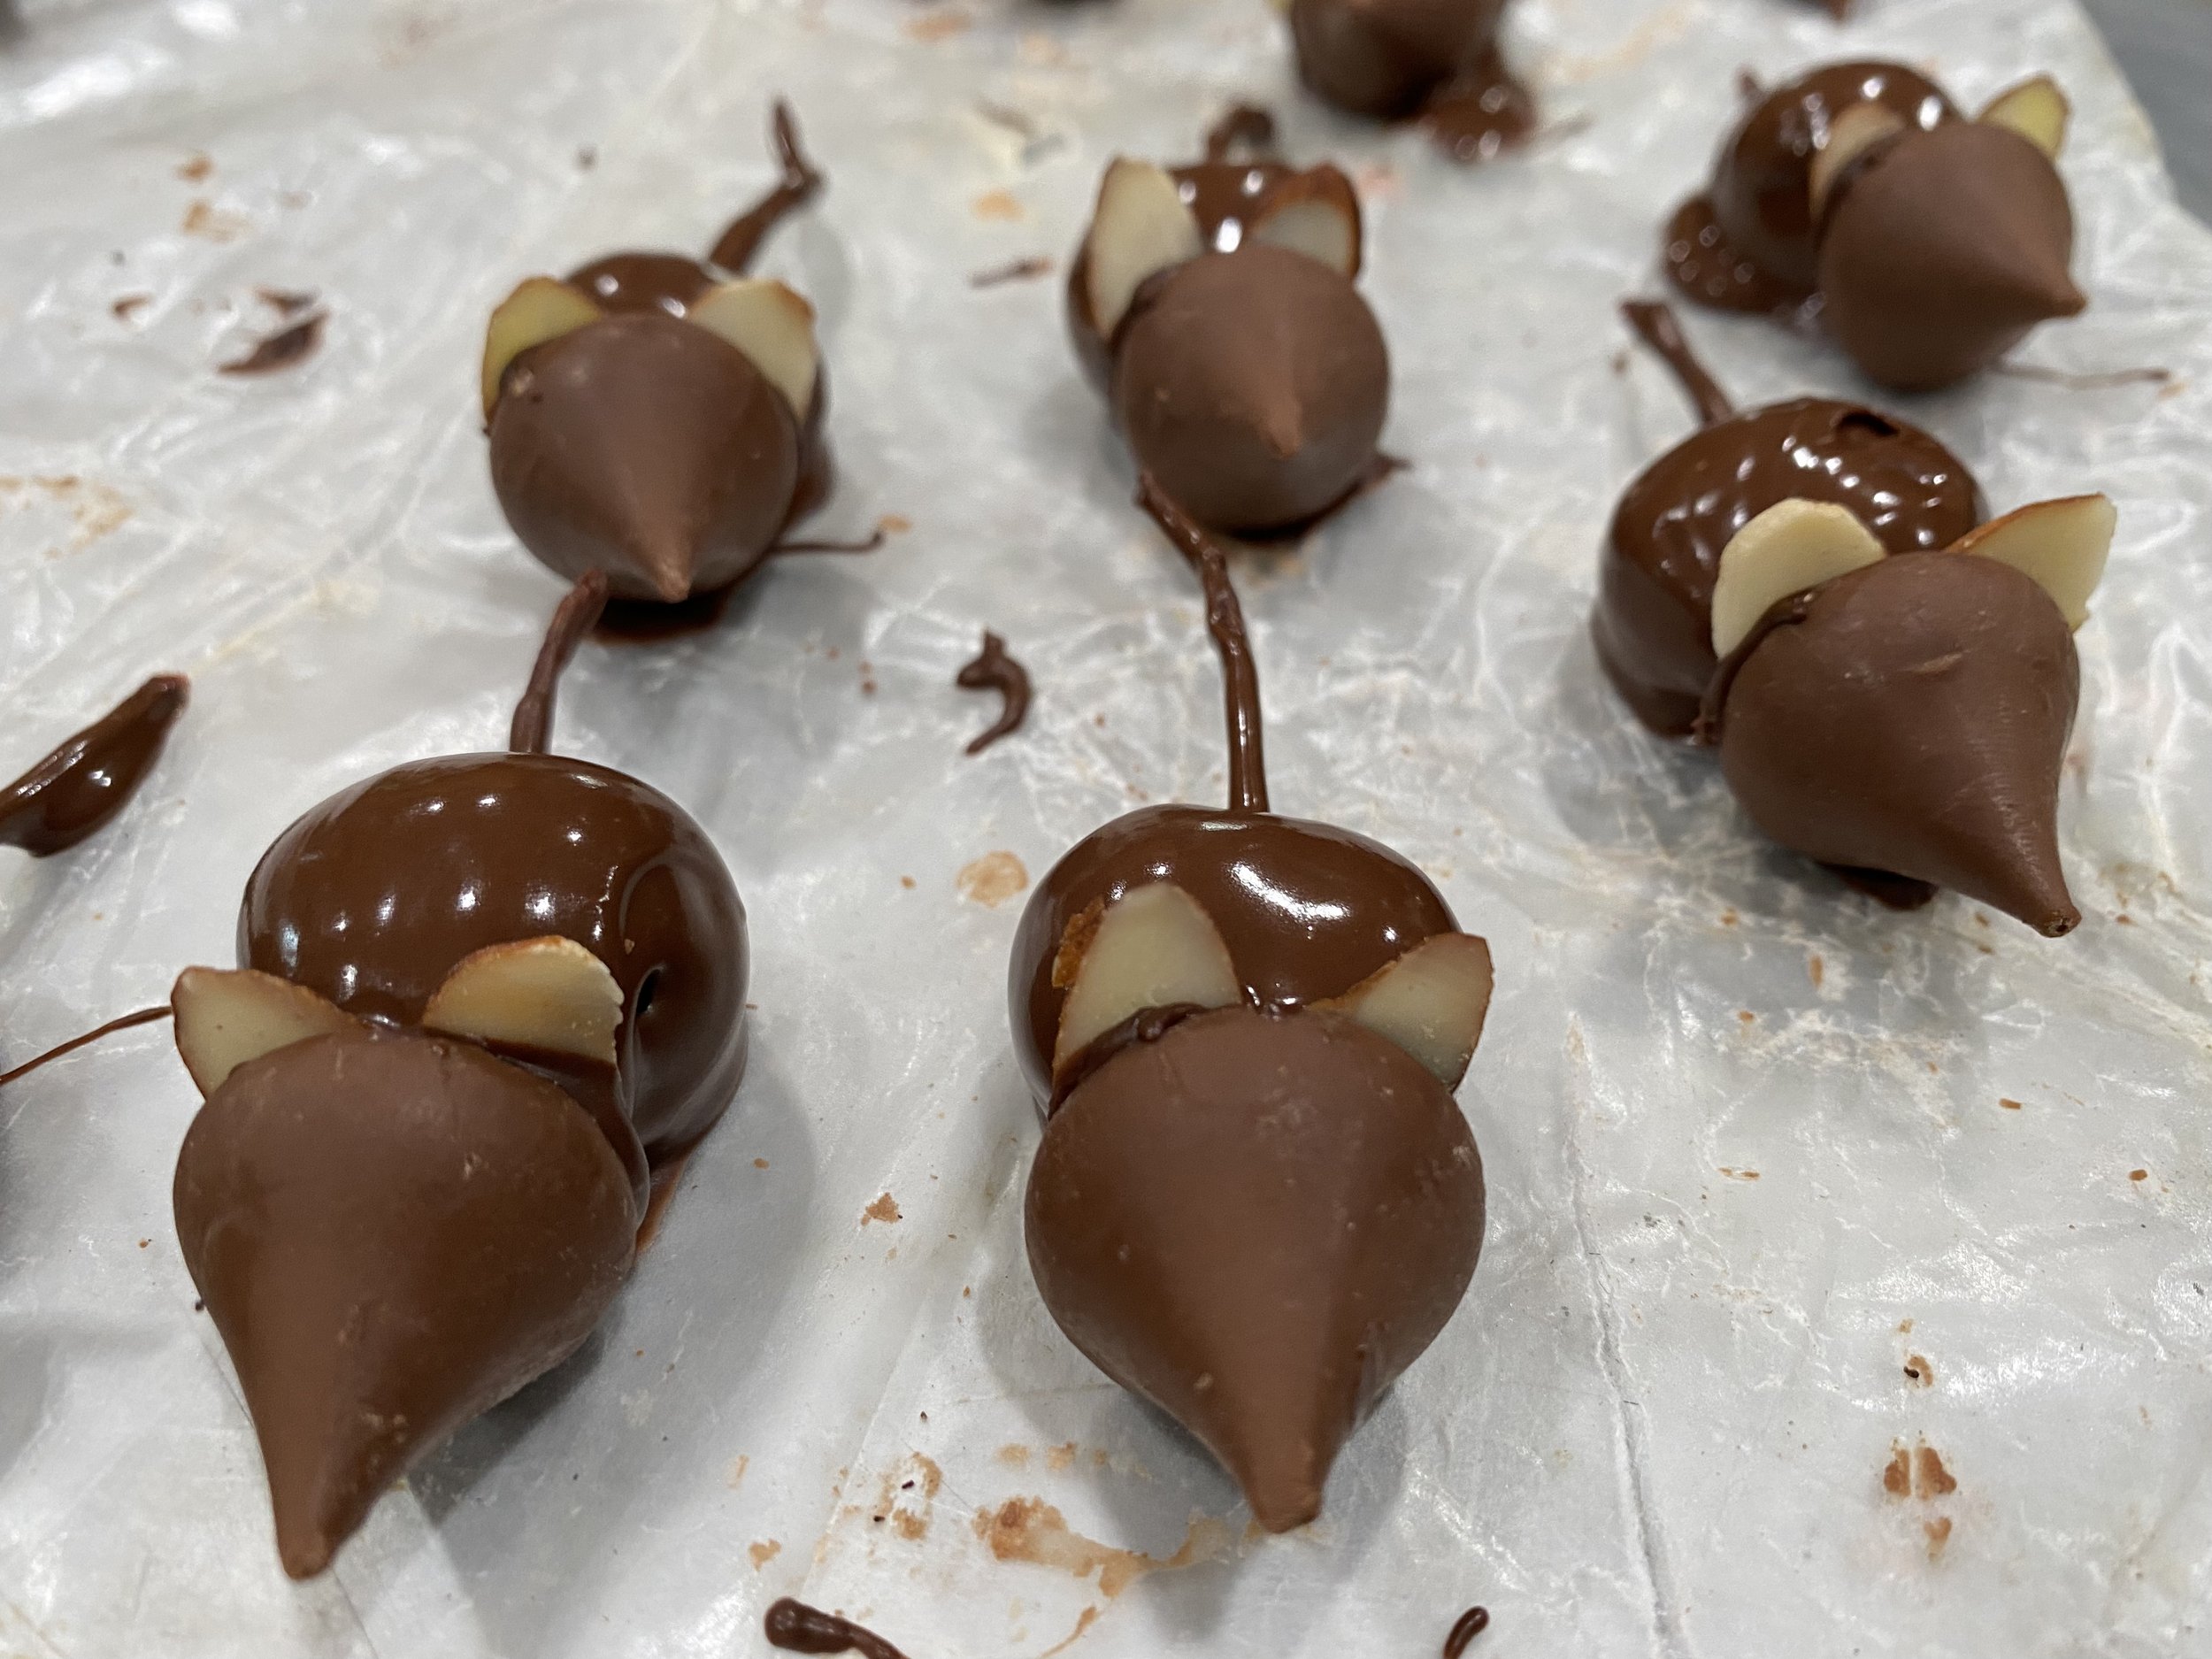
Add two almond slivers to the flat side of Hershey Hug with almost bark “glue.”

Once maraschino cherry is dry, use almond bark “glue” to attach the Hershey Hug with almond slivers to the maraschino cherry. You may need to hold them together until the “glue” sets.

Cut toothpicks into half, then half again. Insert into almond-covered maraschino cherry.

Add two black icing dots for eyes.

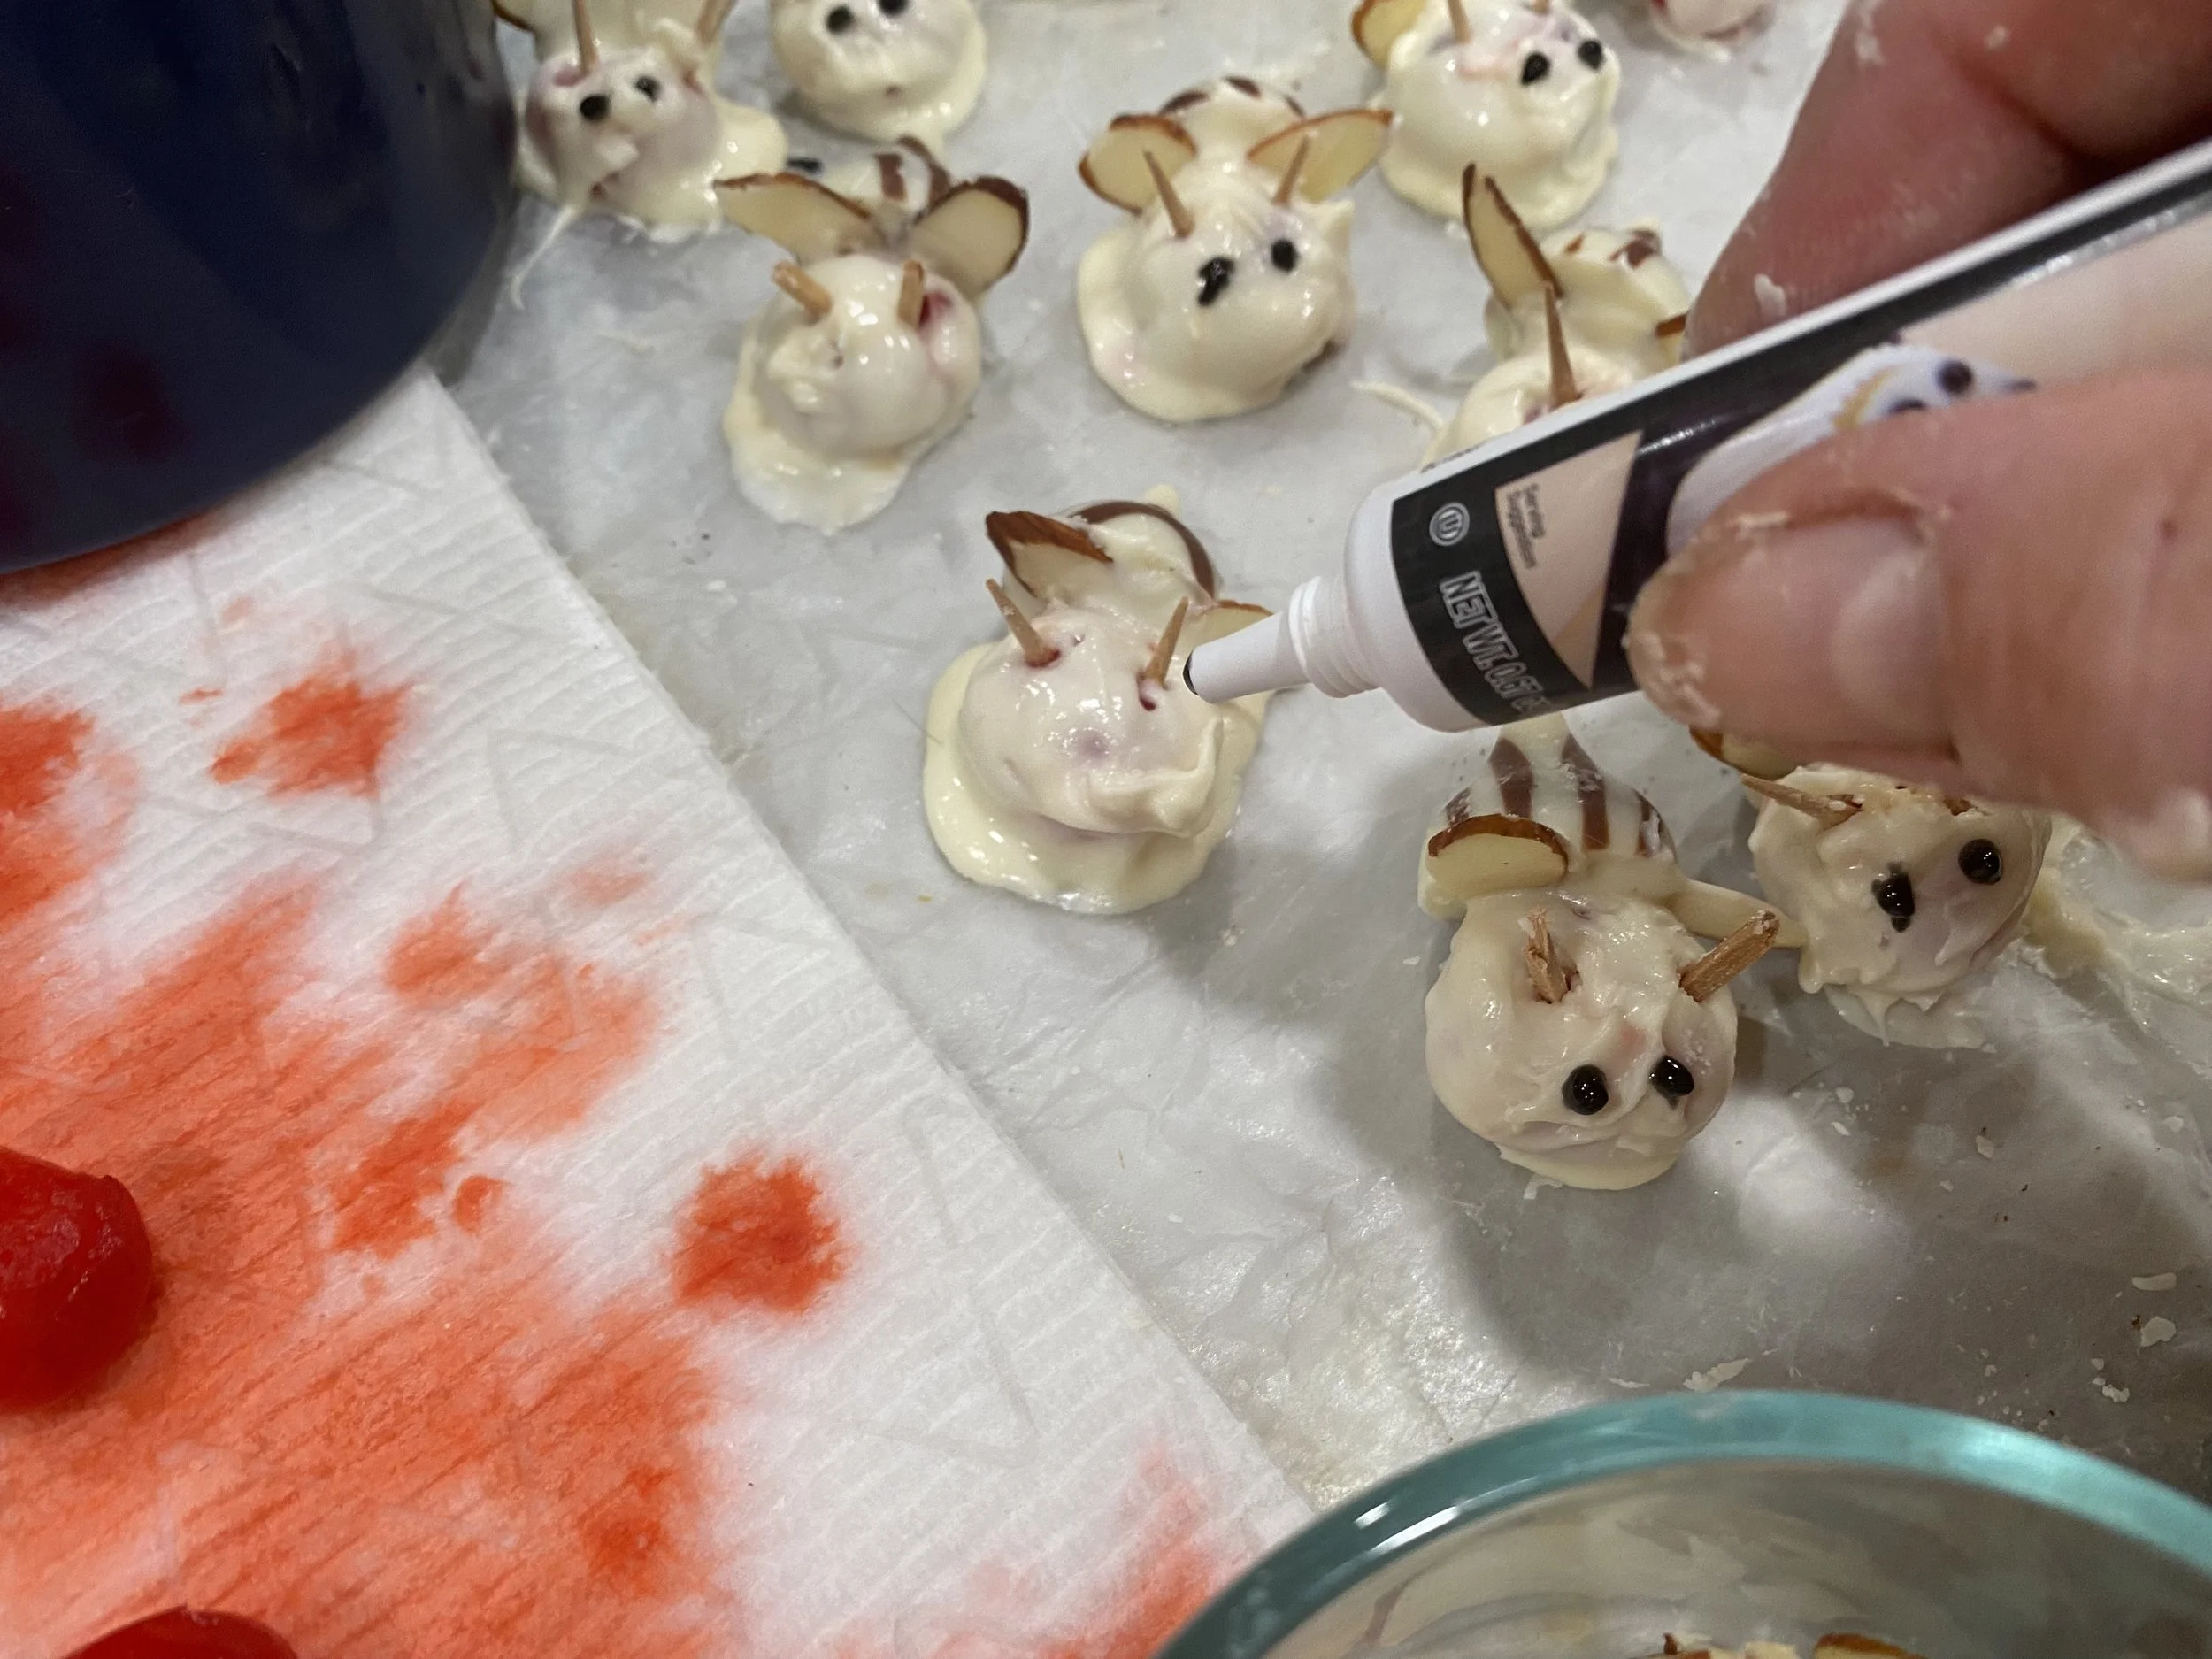
Once Hershey hug is connected to maraschino cherry, time to add eyes. (CHARLOTTE EKKER WIGGINS PHOTO)

Store covered until you plan to use them.

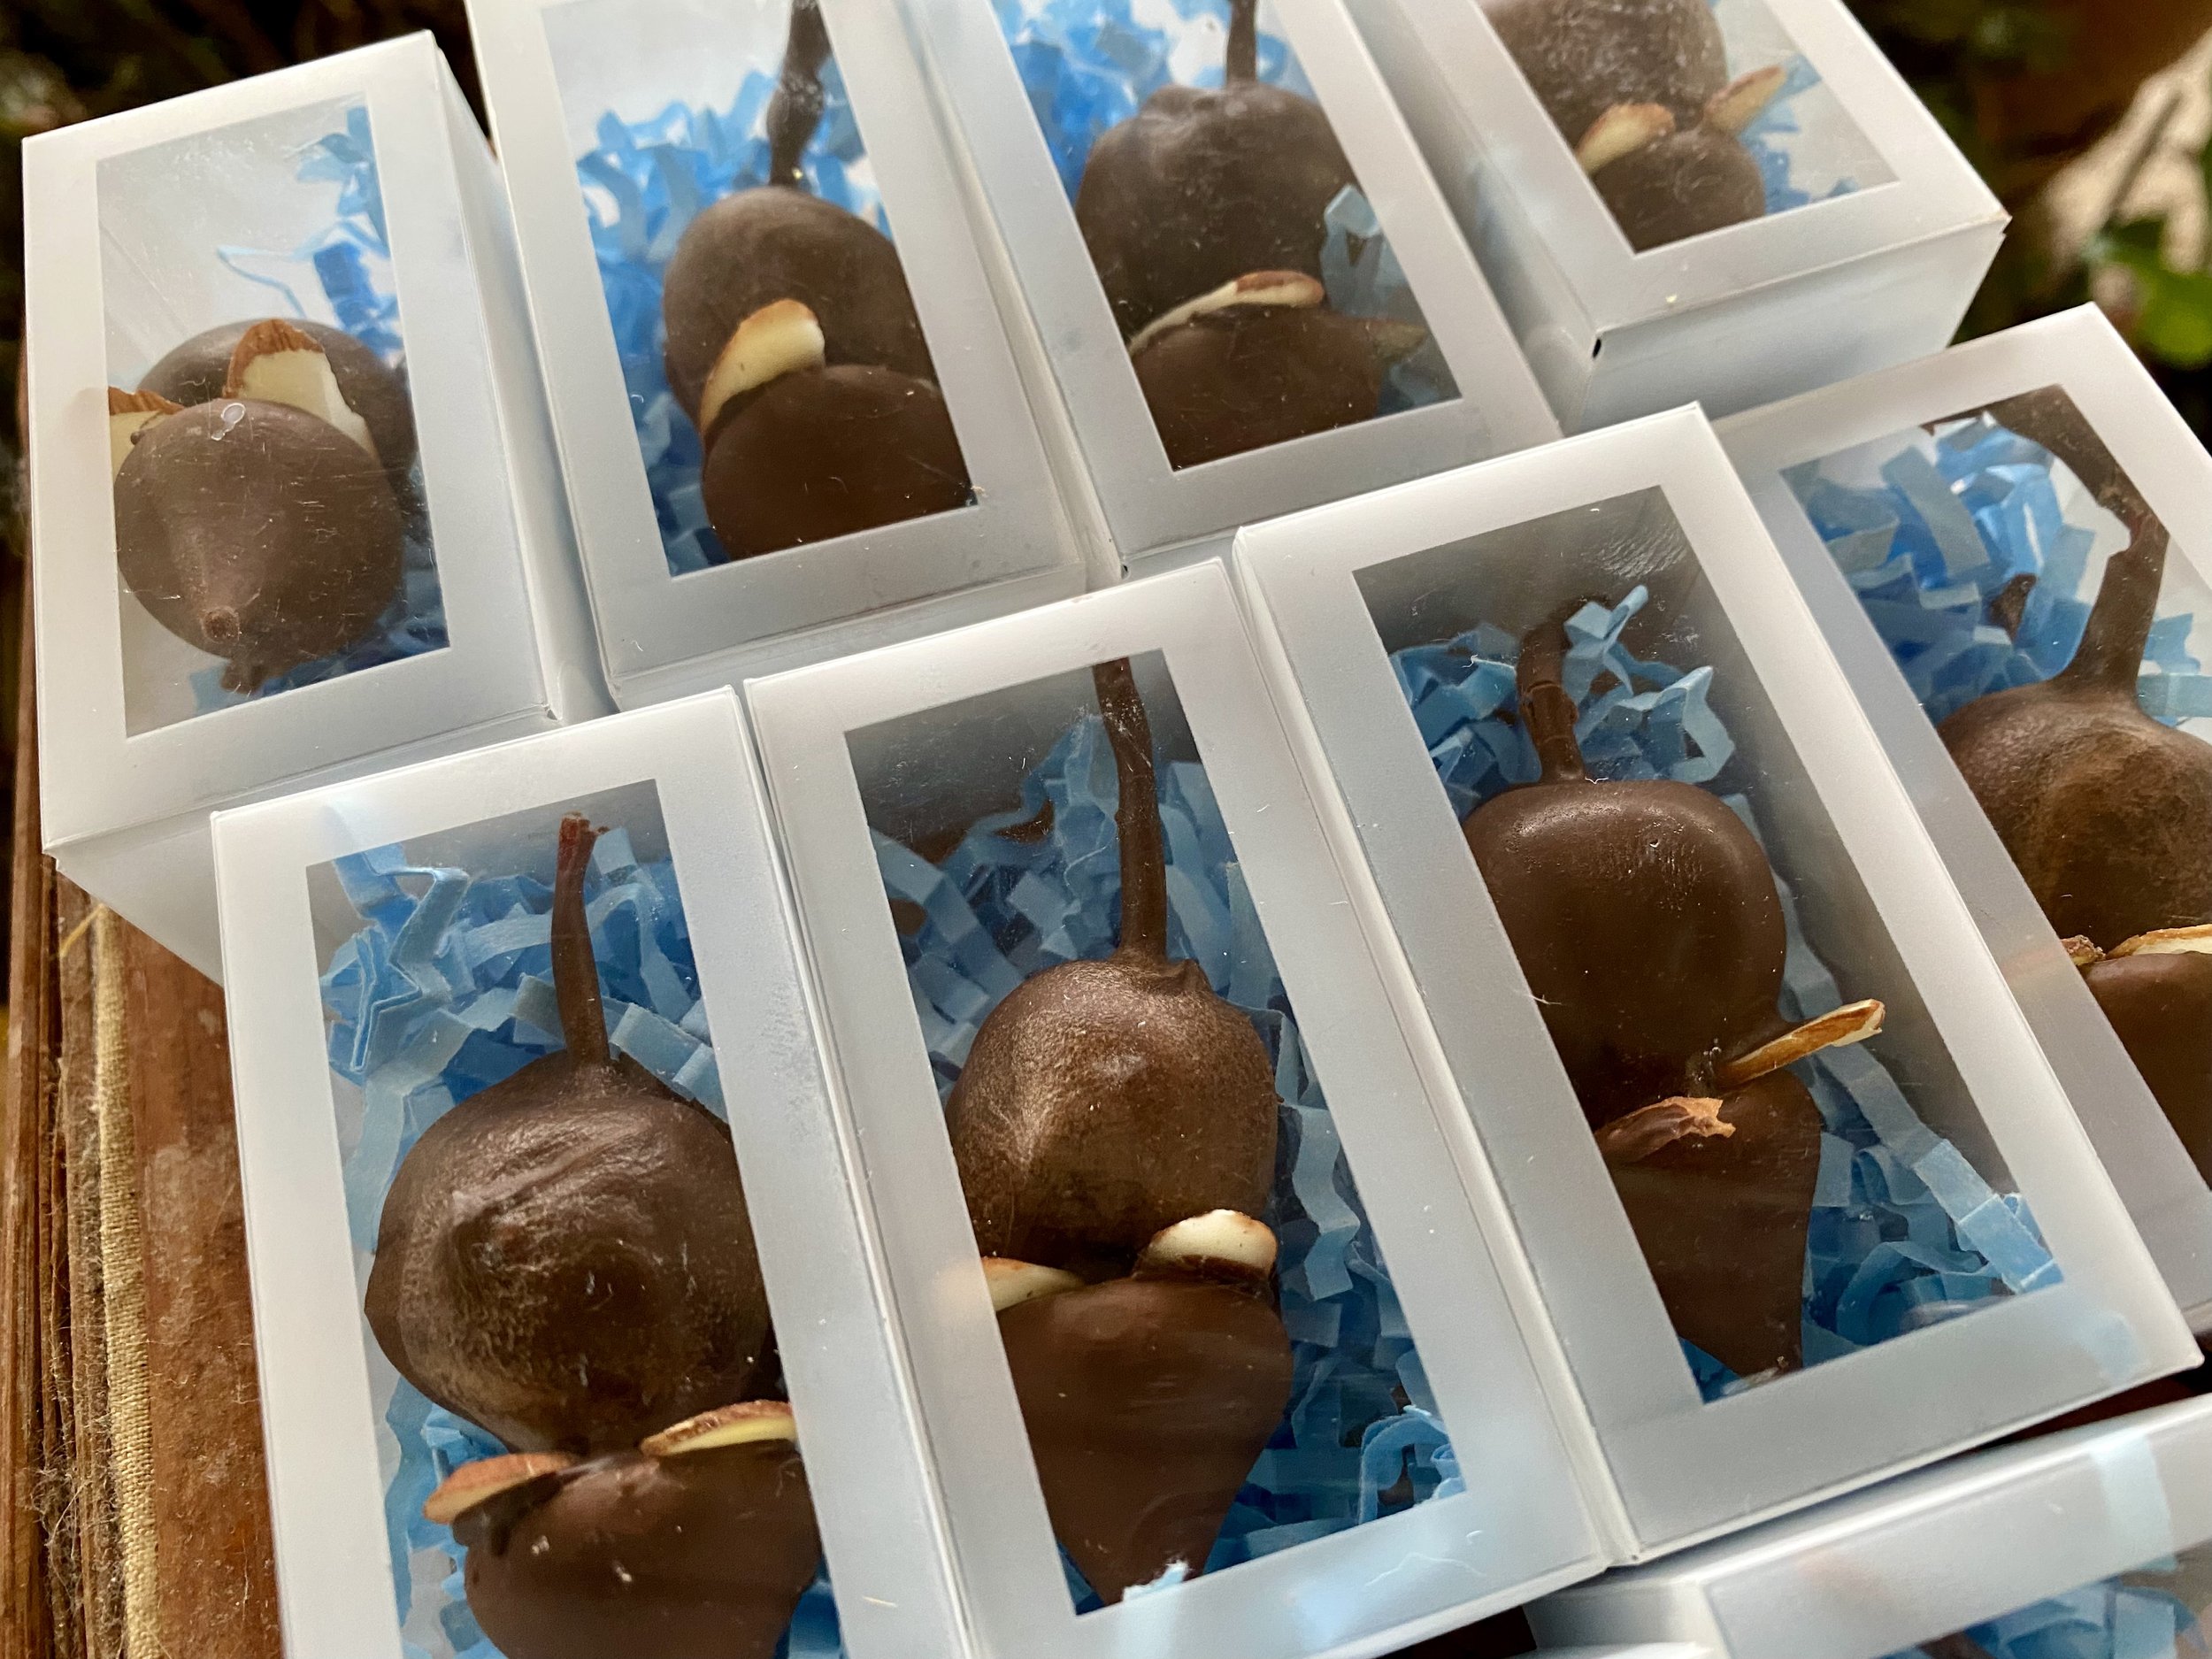
I have also packaged them individually or two at a time in a small gift box. If you can’t find the clear ones like I use for the Hershey Kisses mice, a small jewelry box with a wax paper liner will do just fine or look for bon-bon gift boxes. Your local hobby store will have some options.

Don’t be surprised if you find people aren’t eating them, they tend to be “saved” because they are so cute!

For more cooking, gardening, beekeeping and easy home decor tips, subscribe to Garden Notes.

Charlotte

Chocolate Bon Bons

These chocolate bon bons have been a favorite for years. (Charlotte Ekker Wiggins photo)

Chocolate Bon Bons

I clearly remember the first time my Mom had me try these. She brought some for a special event but would not divulge the ingredients. You know how some people are, if they like something they ask for the recipe.

Later when I asked her for the recipe, she warned me I might not believe her. Of course I believed her but the ingredients were surprising.

And even better, very easy to use to make.

How to Make Chocolate Bon Bons

You will need:

Creamy peanut butter

Ritz crackers

Chocolate almond bark

Wax paper

Test how much peanut butter you like in the center. Test, test, test! (Charlotte Ekker Wiggins photo)

To make:

Add peanut butter to the center of a cracker and top with a second one.

Microwave chocolate almond bark per directions until melted.

Move the sandwich around chocolate to make sure it is coated on all sides. (Charlotte Ekker Wiggins photo)

Dip the cracker sandwich in the chocolate and make sure it is coated on all sides.

Place on wax paper. Allow to dry. Or place in refrigerator to set the almond bark.

Store in a freezer bag or sealed metal can.

These would also be fun to make with miniature crackers with peanut butter.

This would be a perfect recipe to add to our “Write Your Own Cookbook Gift set.” Easy and delicious to make, it’s a great way to introduce someone to working in a kitchen.


Charlotte

Snow Ice Cream

I assure you this snow ice cream was made with brand new snow. (Charlotte Ekker Wiggins photo)

Snow Ice Cream

It’s been on my list of things to try for several decades now. Obviously not high enough on the list or I would have tried this earlier. I grew up in South America without seeing snow until I was in my teens and visiting Washington D.C. so anything snow is a bit of a curiosity for me.

We currently have a good 8 inches of snow on top of ice where I live, which means most of us are staying home and safe until this all melts off. Good enough time to try some experiments such as making snow ice cream.

Now as I was photographing the finished product, my handyman walked by and asked if I was sure I had scooped up unsoiled snow. Very funny, I said, that’s snow ice cream made with honey and vanilla giving it that gold tint.

I tried honey with my first snow ice cream, requiring twice the snow. (Charlotte Ekker Wiggins photo)

I’ve read there are several options for the ice cream sweetener, I chose to use my own honey. Other options are maple syrup and macerated fruit.

I would use whatever you like to eat cold and whatever you have handy.

Snow Ice Cream Recipe

Here’s the first list of possible ingredients:

3/4 cup new snow

1/4 cup maple syrup, honey, macerated fruit

1 teaspoon vanilla

A dab of milk to mix in until creamy.

As a beekeeper, I know the honey will become thick as soon as it is exposed to the cold snow so I ended up using more than twice the suggested snow to try to get it “creamy.”

The honey and vanilla also changed the color profile of the originally-white snow so maybe macerated fruit would be a better visual option.

After mixing the ingredients, I tried it. It takes like one of those summer snow cones with a flavoring added to shaved ice.

Would I do it again?

Probably not, there are much better ways to enjoy the hard-earned honey made by my bees.

Brand new unblemished snow for my ice cream. (Charlotte Ekker Wiggins photo)

And see, the original snow was pristine when I scooped it up to try this.

Have you ever made snow ice cream?

Charlotte

Chocolate Kisses Mice

These truffle boxes are perfect to hold one chocolate kiss mouse. (Photo by Charlotte Ekker Wiggins)

Chocolate Kisses Mice

Oh my, it’s been far too long since I’ve made these simple chocolate and cherry treats. I was inspired to make them this year after my rescue cat James A Mess dropped a play mouse at my feet during a business Zoom session.

These make fun gifts especially from your cats to people who are special to you, and them.

You will need:

Wax paper

Paper towels

Maraschino cherries with stems

Almond slivers

Chocolate almond bark

Hershey Milk Chocolate Kisses

Truffle gift boxes (found online or at a hobby store)

So a note on the two maybe hard to find items:

  1. You need maraschino cherries with stems. I called around to locate them where I live so don’t assume you will find them in any grocery store.

  2. The gift boxes can be anything with a clear top cover, half the fun is seeing them under a bow. If you can’t find boxes, cut out white cardboard pieces that fit into small plastic bags and glue each mouse to the cardboard with a dab of chocolate.

Maraschino cherries with stems drained on paper towels. (Photo by Charlotte Ekker Wiggins)

To make:

Drain maraschino cherries and spread them out on paper towels to get them dry.

Remove foil from Hershey’s kisses.

While cherries are drying, melt the chocolate bark to package directions.

Use the chocolate almond bark to “glue” almost slivers to the backs of Hershey kisses.

Melted chocolate bark holds almond slivers for ears. (Photo by Charlotte Ekker Wiggins)

Allow the glued ears to dry on wax paper.

Dip maraschino cherries with stems in melted chocolate bark; cover.

Maraschino cherries dipped in melted chocolate bark. (Photo by Charlotte Ekker Wiggins)

Remove the chocolate-covered maraschino cherries and let them dry on wax paper. I also make sure the “tails” are laying down so they will easily fit in gift boxes.

Chocolate-dipped maraschino cherries drying on wax paper. (Photo by Charlotte Ekker Wiggins)

With the chocolate-covered maraschino bodies, add the Hershey kiss with almond slivers to form the mice.

Once glued together with more chocolate, they are now mice. (Photo by Charlotte Ekker Wiggins)

Allow to dry. If you need them to dry faster, place in refrigerator for a few minutes.

Store in gift boxes in a freezer bag until ready to give.

Fun for stocking stuffers, neighbor gifts and fans of your cats!

Charlotte

Leftover Fruit Salad

Leftover blueberries, strawberries and bananas. (Photo by Charlotte Ekker Wiggins)

Leftover Fruit Salad

As food prices continue to go up, we may be inspired to appreciate leftovers and use up the little dregs of produce we have remaining in the refrigerator. That’s what I do with remaining fresh fruit, especially berries.

Although I think about making a fruit salad, I tend to wait until the bananas start looking over ripe or fruit choices narrow down to just a few pieces each.

Don’t toss the leftover fruit, remix into a salad. (Photo by Charlotte Ekker Wiggins)

My favorite mix is strawberries with bananas sprinkled with black pepper. The key is to cut them into small pieces including quartering the banana so you can easily compost the parts that are brown.

For this week’s fruit salad, I had a few strawberries, a ripening banana and some blueberries. The green garnish at the top is a tiny piece of lettuce from a salad I made earlier.

Make the leftover fruit salad right before your meal to keep the bananas from browning. I’ve also made the salad the night before and kept in the refrigerator for consumption the next day. The bananas and strawberries marinate overnight, nicely mixing flavors.

To bring out the flavors, experiment with sprinkling with salt or black pepper.

Other Ways to Use Leftover Fruit

Another way to use up leftover fruit is to add it, again cut up in to small pieces, into homemade muffins. One of my favorite combinations is a salad with a side muffin. You will find recipes for muffins and other classic dishes in the 2007 American Illustrated Cooking Encyclopedia. Great gift idea for that new wedded couple and college graduate.

Finally add leftover fruit to that second day salad. The combination will give both leftovers a new lease on a meal.

Cooking at home is a great way to save money, too!

Charlotte

Picking Bartlett Pears

Several Bartlett pears from my semi-dwarf pear tree. Which should you pick? (Photo by Charlotte Ekker Wiggins)

Several Bartlett pears from my semi-dwarf pear tree. Which should you pick? (Photo by Charlotte Ekker Wiggins)

Picking Bartlett Pears

It’s that time of year in my garden; actually it’s a little overdue and that’s picking Bartlett pears from my 37 year old Stark Brother’s pear tree.

I planted the tree close to my deck with the vision of sitting on the deck and plucking fresh fruit out of the tree. I can still do that but the timing is the important part. Besides pears ripening from the inside I have to beat the squirrels to the pears. Sometimes I will find very young pears on the ground from where someone had breakfast. These Dog in the Garden kitchen towels also remind me of my neighbors labs who liked to stop by and take a pear or two home.

To get a good ripe pear, they have to be picked when they still appear green. One trick a friend showed me was to gently bend the pear at a 45 degree angle. If the stem breaks, then it’s time to pick. If not, leave it on the tree and try another day.

Old cake stand makes a handy spot to ripen pears and tomatillos. (Photo by Charlotte Ekker Wiggins)

Old cake stand makes a handy spot to ripen pears and tomatillos. (Photo by Charlotte Ekker Wiggins)

Those green Bartlett pears go into the kitchen and into either a brown bag with an apple or banana. This year I also have them under glass in an old cake stand keeping company with apples and ripening tomatillos. The ethylene gas from the apples will help ripen the pears and tomatillos and I like seeing the pears displayed in that glass stand.

A pear that is ripening will also start to yellow, although it can be hard to tell unless that pear is close other, less ripe pears.

To check if they are ripe, gently press the top near the stem. If it’s soft the pear is ready to eat.

I have removed several yellow pears to find they were already someone’s meal. The pear gets washed and those parts get cut off and composted while I enjoy what remains. I don’t use any chemicals on my trees so I don’t have to worry about what has been sprayed.

I gave a friend two pears a week ago and she left them on her counter for the week. When I stopped by 7 days later, the pears had turned yellow and were soft around the stem, perfect for snacking.

If you want to save them for a specific day, store them in the refrigerator to slow down the ripening process.

One other trick. If you want to enjoy a pear before its ripe, you can cut it up and microwave it for a minute or so. I dust it with cinnamon or, after cooking, a drizzle of honey.

However you enjoy pears, there is something very special about picking your own homegrown pears.

Charlotte


Yellow Mix Lemon Cake

Optional powdered sugar finishes off this yellow lemon cake. (Photo by Charlotte Ekker Wiggins)

Optional powdered sugar finishes off this yellow lemon cake. (Photo by Charlotte Ekker Wiggins)

Yellow Mix Lemon Cake

It’s almost summer and this is a good quick desert option for those picnics and family get togethers. Most of us keep a yellow cake mix in our pantry, or at least I do. It’s my “emergency” go to when I need to quickly whip up a treat for a special occasion or to make an occasion special. Yellow cake mixes can be versatile depending on what small changes are made.

In this case, I am turning a yellow cake mix into a summer fresh Yellow Lemon Cake with thoughts of drizzling fresh honey over it.

Yellow Lemon Cake Recipe

You will need:

1 yellow cake mix

4 eggs

1/2 cup lemon juice

1/2 cup vegetable oil

1/3 cup water or milk

1 tsp vanilla

lemon zest of half a fresh lemon

powdered sugar (optional)

To make:

Mix all ingredients in a bowl on low. Beat on high for 2 minutes.

Pre-heat oven. Glass and aluminum pans cook at 350F; the darker baking containers should cook at 325F for about 30 minutes. Cool.

Turn onto a plate to cool. Optional but a good time to dust with powdered sugar.

Perfect combination of honey and yellow lemon cake. (Photo by Charlotte Ekker Wiggins)

Perfect combination of honey and yellow lemon cake. (Photo by Charlotte Ekker Wiggins)

This cake will be nicely dense so that it can hold up to mashed strawberries, a drizzle of honey and whipped cream.

For a lighter desert, try whipped topping instead of honey. (Photo by Charlotte Ekker Wiggins)

For a lighter desert, try whipped topping instead of honey. (Photo by Charlotte Ekker Wiggins)

It will also freeze quite nicely. After cutting, place the pieces in the freezer until firm so they cam be stored in a freezer bag.

Defrost prior to serving or reheat in microwave for 15-20 seconds.

Perfect to serve with a cup of hot, or cold, tea.

This cake will have a decidedly lemon taste. If you want less lemon, cut the lemon juice to 1/4 cup and increase the amount of water or milk.

Charlotte


Picking Pears

Lift the pear horizontally until it breaks off the stem. (Photo by Charlotte Ekker Wiggins)

Lift the pear horizontally until it breaks off the stem. (Photo by Charlotte Ekker Wiggins)

Picking Pears

I wasn’t sure my squirrels would leave me any Bartlett pears this year. For the past few years, they have ransacked my semi-dwarf pear tree growing right off my house deck. I planted it there in 1985 dreaming of reaching over my deck and picking a fresh pear.

It took a good 30 years before the pear tree produced its first pears. It was the same year I added honey bees to my garden although the bees weren’t responsible for the pollination, wasps were. Since then I keep extra birdhouses in my limestone hillside so paper wasps have a safe place to nest. Wasps are excellent fruit pollinators.

I also keep a variety of potted flowers on my deck to encourage pollinators. They don’t help the pear trees but they help nearby potted herbs and vegetables.

My semi-dwarf Bartlett pear tree almost leans over into my deck. (Photo by Charlotte Ekker Wiggins)

My semi-dwarf Bartlett pear tree almost leans over into my deck. (Photo by Charlotte Ekker Wiggins)

My first year of fruit I had more than 300 pears. Since then, I seem to have one good year interspersed with a lean year. In 2012 when we had a terrible drought, the tree gave me one very huge pear - the fruit was close to the size of a small cantaloupe.

According to Stark Brothers, I need to pinch some of the early pears so that the tree will produce fruit every year. I did that this spring, gently removing tiny pear starts so a branch was hosting only one or two pears instead of several trying to grow in one bunch.

Next year I need to remove one of these pears earlier. (Photo by Charlotte Ekker Wiggins)

Next year I need to remove one of these pears earlier. (Photo by Charlotte Ekker Wiggins)

Late August I start checking my pear tree for fruit. I was pleasantly surprised the squirrels left me a few.

A few Bartlett pears waiting for me to pick them before squirrels get to them. (Photo by Charlotte Ekker Wiggins)

A few Bartlett pears waiting for me to pick them before squirrels get to them. (Photo by Charlotte Ekker Wiggins)

Pears ripen from the inside out. By the time they feel soft on the outside they are deteriorating inside.

The way to select a pear is to press gently on the top where the stem is located. If that area is soft, the pear is ripe.

If the pear is still green, place it inside a brown bag with an apple or banana to capture ethylene gas that will help the pear to ripen. I also leave a couple of pears in my counter fruit basket and check them daily. They usually ripen nicely after a few days.

The extra pears I have I store in the refrigerator until I need them.

When I get too many pears, I share with family and close friends, usually with a little jar of honey.

Enjoying my first homegrown Bartlett pear of the season! (Photo by Charlotte Ekker Wiggins)

Enjoying my first homegrown Bartlett pear of the season! (Photo by Charlotte Ekker Wiggins)

Pears are delicious fresh or diced in salads. You can also bake them sprinkled with cinnamon and drizzled with honey, a perfect winter treat.

And the squirrels?

I just keep planting more dwarf pear trees, surely there will be enough to go around!

Charlotte

Chocolate Mice

Hershey kisses form the face of chocolate-dipped maraschino cherries with stems sandwiching almond slivers for ears.

Hershey kisses form the face of chocolate-dipped maraschino cherries with stems sandwiching almond slivers for ears.

Chocolate Mice

My bee buddy David turned 70 years old this year. To celebrate, his sons joined him for a weekend of fine dining, theatre and catching up on family stories, including a chocolate birthday cake with white icing decorated with, what else – bees.

There’s another passion in David’s life, besides his lovely wife. Three cats have found refuge at David’s house, each with a story sadder than the next one until you see them today, coats shiny as they happily lounge on the grass outside David’s basement office.

There is Shirley, a one-eyed calico suspected of being at least 18 years old who is the self-designated house greeter. Chatty Shirley will let you know it’s time to pick her up when she rolls over after telling you all about her day.

Then there is black Henry with yellow eyes, who hides from most people but who talks to me, especially when he wants inside the house. One time he led me to all house doors to see if I could let him inside. Unfortunately I didn’t happen to have a key and he let me know what he thought of my shortcomings by dashing off.

Finally, there is black and white Smokey, who played hard to get for 3 years and now won’t let David, or Henry, out of his sight. I, on the other hand, Smokey can easily do without and tries to, every time he sees me.

When I heard about David’s landmark birthday, I knew the furry family had to contribute – actually Shirley asked me, she has a lot to say every time she sees me – so I made one of my favorite gift treats, chocolate mice.

These started out as a Christmas-time gift and now I make them whenever I can. They are easy to make and usually bring a smile!

Chocolate Mice Recipe

You need:

Unwrapped Hershey milk chocolate kisses

Maraschino cherries with stems

Dark almond bark

Almond slivers

Storage container

Tin gift can

Wax paper

Paper Towel

How To Make Chocolate Mice

Drain maraschino cherries and place on paper towel.

Unwrap Hershey kisses. It's okay to test them for freshness.

Melt dark almond bark in microwave for 1 ½ minutes until melted. Dip maraschino cherries in chocolate until covered; place on wax paper to dry.

Add dab of melted chocolate to flat Hershey kiss; add 2 Almond slivers. Press against cherry. Allow to dry.

Store in air tight container.

Package chocolate mice in a tin container to keep the almond ears from breaking and add toy mice on top instead of a ribbon for a feline treat. (Photos by Charlotte Ekker Wiggins)

Package chocolate mice in a tin container to keep the almond ears from breaking and add toy mice on top instead of a ribbon for a feline treat. (Photos by Charlotte Ekker Wiggins)

How to Package Chocolate Mice

To make these even more special, I packaged them in a tin container. Make sure the tin is tall enough not to break the almond sliver ears.

If you want to make sure they don’t move, you can use a tiny dab of chocolate to “glue” the mice to a cardboard bottom.

For fun, I added three catnip mice to the tin instead of a ribbon. The gift card was “signed” with the three cats footprints, a cat foot print stamp my cats have been known to use for their gift-giving. I added names just in case David couldn’t distinguish between one set of prints against another one but he seemed to know who had contributed to the birthday sentiments without my saying another word.

These also make wonderful Christmas and Halloween treats. Trick or treat!

Charlotte

Make Your Own Ready to Bake Cookie Dough

Chocolate chip cookie dough frozen in wax paper makes handy cookie dough for quick cooking.

Chocolate chip cookie dough frozen in wax paper makes handy cookie dough for quick cooking.

Make Your Own Ready to Bake Cookie Dough

When I was growing up, this time of year, we would make icebox cookies, cookie recipes designed to wrap the dough up in wax paper and freeze for quick later use.

Years later, I took my favorite chocolate chip cookie recipe, wrapped that up in wax paper and voila - after freezing, I could also quickly cut, cook and serve. Well, yes, they should be cooled but when one has a chocolate chip cookie emergency, there is very little to no rack cooling time.

I have also tested this with some other favorite cookie doughs and they all worked well, too so if you need to make dough ahead of time for cookie baking, this is a good option.

One more tip: if you just need a few cookies ready, bake in an electric toaster oven.

Another important tool for emergency cookie baking, a little toaster oven.

Another important tool for emergency cookie baking, a little toaster oven.

Keep an eye on the toaster oven the first time you bake cookies to make sure you get the right amount of time and temperature.

When finished, cookies look just like they came out of the oven.

A rare sight, chocolate chip cookies cooling on a cookie rack.

A rare sight, chocolate chip cookies cooling on a cookie rack.

Cookies are part of our family holiday tradition so anything that makes the process easier so we can keep the tradition is a great addition!

Charlotte

Baklava Revisited

Alex Pizza baklava topped with Greek Farms, Rolla, Mo. honey but there's more to serving this. (Photo by Charlotte Ekker Wiggins)

Alex Pizza baklava topped with Greek Farms, Rolla, Mo. honey but there's more to serving this. (Photo by Charlotte Ekker Wiggins)

One of the perks of hosting monthly beekeeping meetings is that people bring in goodies to share. One delicious offering comes from Mike Samaras with Alex's Pizza, Rolla, Mo., one of our beekeeping students.

Now I have enjoyed homemade baklava off and on over the years but it's not a dessert I have seen mentioned how to best serve in Missouri cookbooks.  

Mike said the best way to enjoy this delicious pile of filo dough layers filled with chopped nuts is to drizzle honey over the top. Already rich to my taste, adding honey seemed unnecessary but I tried it. It was delicious.

Then Mike said and the other part of how to serve this desert is to add a sprinkling of cinnamon.

A piece of Alex Pizza bahklava served drizzled with honey and a sprinkling of cinnamon. Yumm!

A piece of Alex Pizza bahklava served drizzled with honey and a sprinkling of cinnamon. Yumm!

I took a piece of baklava home, added a drizzle of my own honey and sprinkled with cinnamon. The cinnamon helped cut some of the richness and gave the combination a more subtle taste. Still wonderful and rich.

Thanks for the tip, and the delicious baklava, Mike!

Charlotte


Sweet Nutty Treat

Sometimes you want something sweet to end your meal  and these nutty treats are easy, and fun, to make.

Using mini-vanilla wafers, add a dab of melted chocolate to the bottom. Attach a Hershey kiss.

Once dry, use a toothpick to dab a tiny stem on the top.

Takes 5 minutes from start to finish and adds charm to any dish as a sweet, desert garnish.

Acorns, any one?

Charlotte